For automation engineers, an Industrial Touch Display is more than a screen—it’s the critical link between operators and industrial automation systems (PLCs, sensors, MES platforms). Unlike consumer touchscreens that come pre-configured, an Industrial Touch Display requires tailored programming to match your facility’s unique needs: whether you’re designing a real-time dashboard for a packaging line, a troubleshooting interface for robotic cells, or a data-logging tool for quality control. Poorly programmed displays lead to operator confusion, delayed issue resolution, and even production downtime. This guide breaks down the essential programming workflows, tools, and best practices for automation engineers—so you can build reliable, user-friendly Industrial Touch Display interfaces that streamline automation, reduce errors, and keep your operations running smoothly.
Key Programming Workflows for Industrial Touch Displays
Automation engineers need a structured approach to program Industrial Touch Displays—one that aligns with both technical requirements and operator usability. Below are the step-by-step workflows to follow:
1. Define Requirements (Before Writing Any Code)
Start by clarifying what your Industrial Touch Display needs to achieve—this avoids rework later:
System integration goals: List the automation hardware you’ll connect to (e.g., Siemens S7-1500 PLC, Allen-Bradley Micro800, Modbus sensors). Note which data to read (e.g., motor RPM, batch count) and write (e.g., setpoint adjustments, start/stop commands).
Operator tasks: Map actions operators will perform (e.g., “monitor OEE,” “log defects,” “troubleshoot jams”). For example, a food processing line’s display might need a “Cleaning Mode” button to lock machinery during sanitization.
Safety rules: Include compliance needs (e.g., password-protected maintenance modes, two-hand confirmation for emergency stops) to meet standards like IEC 61508.
2. Set Up Communication with Automation Hardware
An Industrial Touch Display only adds value if it can talk to your automation system. Here’s how to program communication:
Choose a protocol: Pick an industrial protocol compatible with both the display and your hardware. Top options include:
Modbus TCP/IP (for Ethernet-connected PLCs and sensors).
Ethernet/IP (Allen-Bradley’s protocol for ControlLogix/CompactLogix systems).
PROFINET (Siemens’ high-speed protocol for manufacturing lines).
Configure device connections: Use your display’s programming software (e.g., WinCC, FactoryTalk) to add your PLC/sensor as a “device.” Enter its IP address (Ethernet) or COM port (serial) to establish a link.
Test communication: Verify the display can read/write data. For example, send a “start” command from the display to the PLC—if the machine activates, communication works; if not, troubleshoot cables or protocol settings.
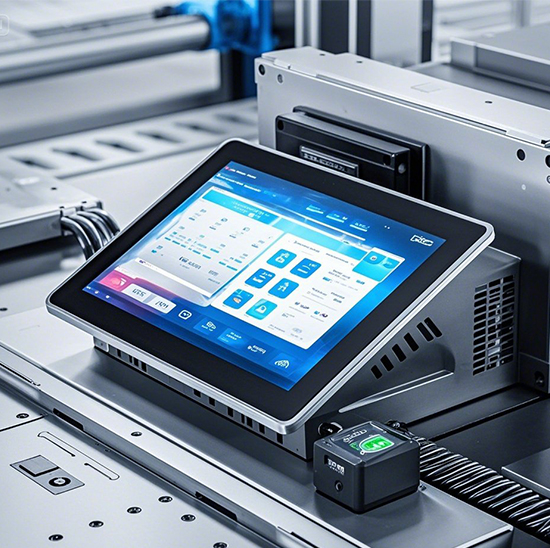
3. Design and Program the User Interface (UI)
This step turns your requirements into a functional Industrial Touch Display interface:
Layout design: Use drag-and-drop tools to add UI elements tailored to operators:
Data visuals: Gauges for real-time metrics (e.g., pressure), trend charts for historical data (e.g., temperature over 8 hours), and color-coded status indicators (green = running, red = error).
Controls: Buttons (start/stop), sliders (setpoint adjustments), and dropdowns (batch selection). Make elements 15mm×15mm minimum for gloved use.
Alerts: Pop-up windows for critical errors (e.g., “Low oil pressure”) and status banners (e.g., “Batch 75% complete”).
Add logic with scripts: For advanced features, use simple scripting (VBScript in WinCC, C# in FactoryTalk) to:
Auto-load data (e.g., “Pull batch details from MES when an ID is entered”).
Enforce safety (e.g., “Disable ‘Start’ if the machine door is open”).
Log data (e.g., “Save defect counts to a daily CSV file”).
4. Test, Debug, and Deploy
Thorough testing ensures your Industrial Touch Display works reliably in production:
Functional testing: Validate every UI element—adjust a setpoint slider and confirm the PLC receives the value, or trigger an error to check if alerts appear.
Debugging: Fix common issues like:
Data lag: Reduce polling intervals (e.g., from 1s to 200ms) or switch to a faster protocol (e.g., PROFINET instead of Modbus RTU).
Script errors: Correct syntax flaws (e.g., missing semicolons) or logic gaps (e.g., a “Stop” button that doesn’t reset the batch count).
Operator acceptance testing (OAT): Have frontline teams use the display for a shift—gather feedback on clarity (e.g., “Are alerts easy to see?”) and tweak the UI as needed.
Essential Tools for Industrial Touch Display Programming
Automation engineers need the right tools to program Industrial Touch Displays efficiently. Below are the must-have software and hardware:
1. Programming Software (HMI Development Tools)
Choose software based on your Industrial Touch Display brand and automation system:
Siemens WinCC: Ideal for Siemens displays (e.g., KTP series) and PLCs (S7-1200/1500). Supports VBScript, data logging, and integration with TIA Portal.
Rockwell FactoryTalk View: Designed for Allen-Bradley displays (e.g., PanelView Plus) and PLCs (ControlLogix). Features drag-and-drop UI design and cloud remote access.
Delta DOPSoft: Free tool for Delta displays (e.g., DOP-B series). Works with Modbus, Ethernet/IP, and PROFINET—great for mixed automation setups.
InduSoft Web Studio: Cross-platform option for most displays (Advantech, Beijer) and PLCs. Enables web-based access to the display’s interface.
2. Hardware and Accessories
Programming cable: Use the manufacturer’s recommended cable (e.g., USB-C to Ethernet for Siemens, RS-232 for older displays) to connect the display to your computer.
Test bench: Set up a small-scale system (PLC + 1–2 sensors) to test the display without disrupting production.
Debugging tools: A network analyzer (Wireshark) to monitor data traffic, and a multimeter to check power/communication lines.
Best Practices for Industrial Touch Display Programming
To ensure your Industrial Touch Display delivers long-term value, follow these best practices—aligned with both engineering needs and operator usability:
1. Prioritize Reliability and Safety
Minimize dependencies: Avoid third-party software (e.g., external data loggers) that could cause crashes. Use the display’s built-in features instead.
Add fail-safes: Program the display to revert to a “safe state” (e.g., stop machines, show alerts) if PLC communication is lost.
Document code: Comment scripts and save a configuration log (e.g., “Protocol: Modbus TCP, Polling Interval: 200ms”) for future maintenance.
2. Optimize for Operator Efficiency
Keep the UI simple: Focus on 5–7 key metrics per screen. Use tabs (e.g., “Dashboard,” “Troubleshoot,” “Logs”) to organize content.
Use consistent design: Stick to a color scheme (green = normal, yellow = warning, red = error) and button placement (e.g., “Start” left, “Stop” right) across all screens.
Support gloved operation: Increase touch sensitivity in settings—this lets operators use the display without removing industrial gloves.
FAQs About Industrial Touch Display Programming
Q1: Can I reuse code from one Industrial Touch Display to another (e.g., packaging line to assembly line)?
A1: Yes—most software lets you export templates (UI layouts, communication settings) and modify them for new displays. Just update device connections (e.g., PLC IP address) and adjust UI elements to match the new line.
Q2: Do I need advanced programming skills (e.g., C++) to program an Industrial Touch Display?
A2: No—basic scripting (VBScript, ladder logic) or drag-and-drop tools handle 90% of tasks. Advanced languages are only needed for custom features like database integration.
Q3: How do I update the program on a deployed Industrial Touch Display?
A3: Most displays support over-the-air (OTA) updates via Ethernet—push new code from your computer without physical access. For older models, use a USB drive to load the updated program.
Q4: What if my Industrial Touch Display’s program gets corrupted (e.g., power surge)?
A4: Always back up the program to cloud storage or a server. If corruption occurs, reload the backup via USB/OTA. Many displays have a “recovery mode” to restore factory settings first.
Programming an Industrial Touch Display is a critical skill for automation engineers—it turns a generic screen into a tailored tool that empowers operators and streamlines automation. By following structured workflows, using the right tools, and prioritizing reliability, you can build interfaces that reduce downtime and keep your facility efficient.
If you’re stuck with Industrial Touch Display programming (e.g., troubleshooting PLC communication, designing a complex UI, or need help with OTA updates), fill out the form on our website. Our automation experts will analyze your system (PLC brand, display model, production goals) to provide step-by-step guidance or custom support—helping you build a high-performance interface for your industrial setup.